I now feel like I am ready to do some painting. So I'll show of the teams before I prime them. Starting with the pump wagons.
Lots of pictures incoming so I'll just put one picture of the unmodified one here for reference. First Pumpwagon for my Old-school snotling team. I've documented getting started with this one in Goblins Part III, and further progress in That did come in handy.
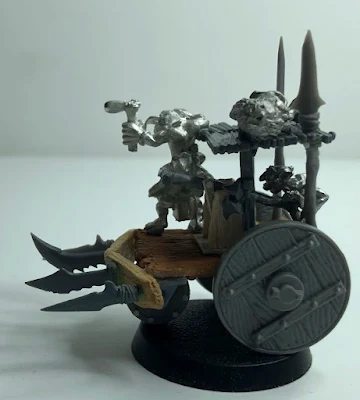
Due to the cramped nature of the models I'll paint them without the crew attached.
My old-school snotlings are a mix of styles since the miniatures are sculpted by different artists. I have tried to make up the crews from more than one sculptor to tie them in with the rest of the team. I mainly ended up with a crew mix of the two previously released pump wagons, those released in 1987 and 2003.
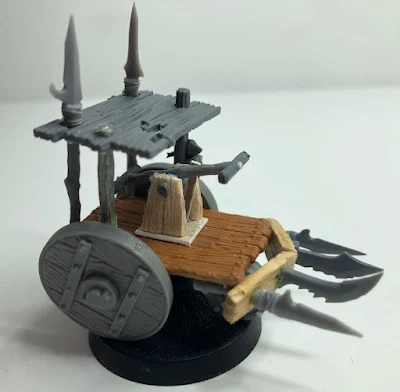
I need to add a flag to the spear to make it fit a bit better. The front is from the 2003 pump wagon set and I was planning on adding a crows-nest, inspired from that same set. Once I got to the point photographed above, it didn't seem necessary. I need to figure out a good, quick wood paint recipe. I hope that a speed paint or contrast paint will do the job, please let me know if you have a favourite.
Here you can see two old shields glued together to form the wheel for my next contraption! Bolts are great to add a bit of detail. I create by own bolts using StripStyrene. I push the plastic rod into blue tack, I then slice it fine with a hobby knife, the blue tack stops the bits from flying off or rolling away. Then I use a needle to move it over to the glue and then to the model. You can then shave it down with a razorblade or scalpel when glued in place on the model if you find it sticks out too much. This works well for cutting small discs to make gold coins as well.
I had a lot of chopped off spear heads and swords from previous conversions that worked great to create a cobbled-together kind of look for the bumper. It just needed a blob of green stuff to angle it straight forward. Having stabby things on the front is present on both the 1987 and 2003 pump wagon sets but I wanted to make a bit more references to the 1987 one when making my 4th vehicular monstrosity.
I needed to add something to justify the forward movement. I decided to add a pump but needed to figure out how a pump cart actually worked, so I found some diagrams as shown above. I discovered that I needed a second arm, attaching off-centre from the pivot point to allow for the pump action to be transferred down below to further gears which move the wheels. Down below won't be seen on the model so I had no need to create that part.
The arm, shown with the red arrow is another hack of mine using cut up old bank cards (and old phone cards if anyone still knows what they are). I cut out a slot in the base of the pump platform to suggest it would be open all the way down underneath, a small detail that I don't think will be picked up by most people but more for my sake.
The undercarriage. It will have its wheels glued on after painting. The wheel axel is a cut down cotton swab. The braces are made in folded aluminium from a tea light. I've added rods to help attach the front bumper to the main body of the wagon. It really hurts me that they miss align with the outermost spear heads. They where never meant to align, it's just how it visually suggest towards it that disturbs me. I have told myself to leave it since it's underneath and will not be seen.
The front wood is an ice lolly stick and the pump sides are balsa wood. The balsa is a lot softer but other than that I don't know if there was that much benefit to the balsa wood over your average birch. I will report back when I know how it painted up.
It felt fitting that the green skins would have spears lying around that would be used to prop up the roof. These where spear arms that have been cut off the Battle of Skull pass goblins. I got so many of them still lying around.
I was going to add a bit of green stuff wrapping to attach the handle bars properly to the axles for the pump but again tried to rain myself in and a bolt/nail is good enough for greenskin engineering.
I like riding on the other guys shoulder to get a better shot rather than getting on the roof.
The bottom guy is supposed to be manning the other end of the pump.
My 2nd pump wagon for my modern snotling team. I've documented getting started with this one in That did come in handy.
The aluminium that held the rudder wheel looked a bit too fine to fit in so I bulked it up with some green stuff.
The front wheels are from a skaven plague catapult but I have cleaned them up a bit, removing skaven runes and such. The rest is almost all from the blood bowl pump wagon. I go into more detail in That did come in handy.The crew is also a converted, hacked and slashed mix and match of different snotlings. We don't speak about the gnoblar.
I might add a bottle or a stein in the "guy with the hat"'s hand.
There was a lot of pictures for this post so I'll finish off here. Next up we'll look at positionals.
Click here to read more posts on the project:
| Part -1 || Part 1 || Part 1.2 || Part 1.5 || Part 2 || Positionals || Linemen || Staff || Old Positionals || Old Linemen || New Linemen || New Positionals || Pump W & Trolls || Trolls || Finished |







Great work, very inspiring! Might have to build a pump wagon myself, haha :D
ReplyDeleteIn regards to painting wood, I can recommend Wyldwood Contrast paint, it's great for creating dark wood.
Do build one! It's worth it, both fun and rewarding! I'll see if I can get hold of some. Thank you for the comment and the recommendation.
ReplyDelete