You might have noticed in the picture I couldn't actually stick to my plan and leave things alone. I assembled the first sprue then realised I couldn't just do the same model but with a different head, I had to alter some poses as well.
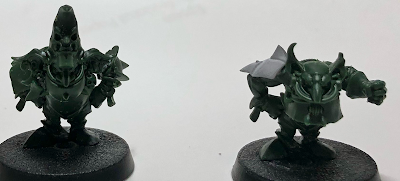
So the bonesaw came out... and after a bit of chopping I was satisfied with the difference between them. I haven't gotten around to the troll yet, but I hope I can keep the ball rolling. I will do a bit of cutting to get him to stop salsa dancing. Varag Ghoul-Chewer. He's not part of the team but got included since he was on a green sprue.I won't be attaching the ghoul spike I don't believe.First pair of goblins. Left is un-modified. The right has the base of the normal shoulder pad cut off and got a new one curtesy of a Saurus Warrior from the Lizardmen fantasy range or Seraphon as they are called now. I also cut off the squigish bug thing that he was holding. I didn't see the need for it and was a bit of an eyesore I thought.Here I introduced a new head from the Squig Hopper pack, since both these heads are noticeably similar. New head also conveys more of the thick skull trait. Cut off the hand of the old head and rotated it slightly. Shaved off the skull motif from the armour just to have a different look.Cut off the arm and took the arm from the upcoming pair. And assembled it all in a striking power ballad pose. I probably should sculpt on some larger ears to fit in as who ever sculpted these guys did go all in with the size on goblin ears.
I seem to have shifted over from untouched on the left to on the right now.
My least favourite pose. It's all dynamic and stuff but looks a bit odd and only has one contact point for glueing. I lowered the toes down to give two contact points so he'll be less likely to break off when being dropped and knocked over. I'm not overly fussed about either of the heads but kept the full helmet one but got rid of the weird beaky one. But still went with a beaky but more of a vulture looking one from the squig set. So to try to convince anyone that this isn't the same model with a different head I needed to go a bit extreme. I cut both arms off. Put him down on the foot that was in the air originally and then went for the footballer/soccer player just scored and pretending he's a plane routine. Sort of goes with the avian head theme...
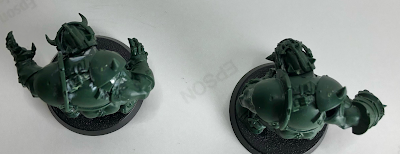
The smallest of the modifications- I cut the left arm just below the shoulder pad and rotated it and altered the angle slightly on the right one as well.Easier to see from behind the difference in angle on the right/now the left arm.Here we've got a full arm swap with the next pair since the glove/mitten is so recognisable I was going to take it out entirely first but since the muscle bulk isn't quite to scale with any other orc bits I had at hand I decided to go with just a swap and I think the poses are different enough to not be too eye catching.I also rotated the right hand to be more of scooping motion. This is probably the modification that bothers me the most since the muscles in his lower arm do not align with that hand position but I'm trying to look the other way since I doubt it will be seen since it's shadowed by the massive bulk of his torso.And we're back to modified on the right. Sawed off the left arm and rotated it in towards the body. Some filling needing to be done for the hole in the shoulder or I could extend the shoulder pad to cover it but that in turn wouldn't be great for mobility, so I'll see what looks best.As seen from above it's easily overlooked that these are the same model. Since the team is from the Blood Bowl Second Season Edition starter box the assembly instructions and rules pamphlet is a bit different and also includes the imperial nobility team.
Pages 1. Assembly instructions for Varag Ghoul-chewer and Ogre.
Pages 2. Assembly instructions for Imperial nobility team.
Pages 3. Assembly instructions for the Black Orc team.
Pages 4. Assembly instructions for Griff Oberwald, Troll and Biased referees.
The instructions tell you to glue the face (#3) to the torso, then glue the helmet pieces (#4 and #5) together and put it over the face. THIS DOES NOT WORK. It is recommended to glue the face into one helmet piece first, then add the second one and to add the full head to the torso.
The instructions tell you to glue the face (#3) to the torso, then glue the helmet pieces (#4 and #5) together and put it over the face. THIS DOES NOT WORK. It is recommended to glue the face into one helmet piece first, then add the second one and to add the full head to the torso.
Both teams transfer decals.
I put this post together after a request from a reddit user to clarify what reposing I've done. Hope this helps and please do let me know in comments below if I should add some more pictures with red cutting lines where the cuts have been made.








Comments
Post a Comment