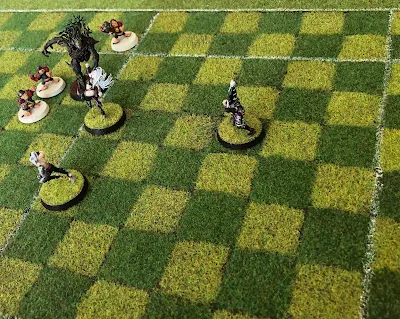
Marked out 34mm squares
20x11 grid.
I did a base of paint with metal dust for magnets to grip on and to add some mud texture. I did not take in to consideration the lift of the static grass which negates almost all this effect but I gave it a try. Next pitch might start of with a steel sheet rather than mdf and see how that goes but might not need more than one grass pitch and without the grass there isn't a problem...
Brown paint and a bit more texture.
It looks a bit wet in one corner because I tried a few different mixtures to create a wash... I kept tweaking this till I was happy with it and then applied it later on.
Did another shade of brown only for my sake to be able to keep track on which grass goes where since this won't really be visible. I ran out of my mixed up brown a couple of times hence the multitude of shades going on.
Dry brushed a lighter colour to highlight raised textures. All this ground work is a bit overkill but if tufts were to come off, I want it to look nice underneath and therefor saving me having to touch up the pitch as often.
A homemade brown wash, as mentioned above, brings everything together nicely.
Started applying static grass using a 50/50 PVA glue to water mixture.
On the left you can see my home made stilous. A pen casing with the core ripped out and copper wire inserted. I clip on the crocodile clip to that and then point the end into the glue for the square I'm working on.
I decided that the size of sieve my static grass applicator came with was too big, so I found myself one with a smaller diameter and slightly denser mesh. I added a plastic card in the handle so I could mount it in the applicator.
I used hot melt glue to stick on a lid to the sieve- in this case, I repurposed a basic small Sistema snack box.
I tried many different sizes for holes in a 'salt & pepper shaker style' configuration but it didn't work so in the end I cut out a central larger hole as you can see in the picture.
I unsoldered the old one and soldered in mine. It worked a lot better. It clogged up a bit but better that than just emptying all at once, all the time. I had an old tooth brush at hand that I just ran it over the sieve ever so often to clear any clogging.
A homemade stylus / node to hold on the board to complete the circuit. It's just thick copper wire inside a ballpoint pen casing. Electrical-tape to hold it in place at the bottom.
Then it was the time for markings...
I tried putting nails and running a tread across. Most strings are too thin. When you let go of tension it does not go well. Doesn't really work to paint over them. Cables are not flexible enough. I tried painting sticks and dabbing. The old red measuring sticks from the starter boxes are not straight...
Cling film is stretchy. You can't make a straight stencil out of masking tape nor find a good way of holding it down. It will pull static grass off but won't stay put when you want it to. It's as hard to cut out a straight and accurate hole in a big piece of paper. I can go on but won't.
I went through so many different methods trying to mark things out in straight lines. But in the end I drew it by hand because it was as accurate as any method I've tried or better.
Depending on the angle of the grass the white lines are more or less visible but they are clearer in person.
Added grass to the sidelines.
Think if I were to do it again I would have gone with two shades of green slightly closer to each other like the sideline and the light green for the pitch but this contrast is user-friendly for when playing on it.
Next side project is to build some 'not so grand stands'! So then, we can have some spectators for the matches.


The dark squares is World war scenic static grass 2mm summer.
ReplyDeleteThe lighter squares are Gale force 9 hobby scenics static grass.
For the side lines I just cut some strips from an old knackered grass mat I had at hand.
Very nice work! It's inspired me to have a go at making my own pitch!
ReplyDeleteThat's great to hear! It's worth it, a lot nicer to play on. I'll keep an eye out for it on your blog.
DeleteWife and I are just getting into Blood Bowl and decided to start with 7s. Glad I found this itll help out a ton in making our own. We will start a similar blog and send ya the link when its done.
ReplyDeleteThat's great to hear! I'd love to have a read please do!
Delete