I’ve been prejudiced against airbrushing, feeling it somehow is cheating and not liking how a lot of airbrushed miniatures look. But as one of my music teacher once told me: "You are competing against the best musicians in the world to get this job and you have to use all the tools available to you to get it. I don’t care what you class this as, if the end result is better it doesn’t matter what means you use to get there." It was about improper fingering in fast passages but the message still holds- if it’s quicker for me to get more miniatures painted and on the table then that is what matters.
So I’m coming into this looking for a way to base coat and hopefully add some block colours to speed up the painting process. The convenience and environmental factor of not using aerosols and financial savings on not buying rattle cans are a bonus and if it gives my paint job a boost by allowing Zenithal highlighting then that's great too, since I’m in it for the savings on my hobby time which feels to be on lacking at the moment!
I did some researching a while ago and waded through tutorial videos on airbrushing. Here are my highlights on what I've picked up.
Don't go for the cheapest thing you can find, it will just cause you grief and put you off, but don't spend a fortune either, your first car is something that you can afford to wreck.
I bought the Timbertech Airbrush Kit with Air Compressor ABPST05.
It seemed like a decent starter, I had heard some good things from people about Timbertech. It has dual action (see below), a moisture trap and a couple of different needles so might allow me to try things out. Finer needles supposedly give you better precision but are more likely to clog. However, the quality of the brush seems to be the main factor on how much more precision you get with the finer needles. 
In two stage action, the first is to let air through on pressing down the button and second, pulling back to let paint in. I was told in several videos the importance of starting and ending each spray with just air to stop clogging and paint drying on the needle. I do think that my brush is still leaking some paint through when I'm just pressing down for air though, so I might have to look into if I need to adjust my needle.

How much air pressure people work with seems to be down to personal preference, their style, paint used and technique. If you spray on a piece of paper and the paint is running away from the centre in thin lines your air pressure is either too high or your paint is too diluted I believe. More pressure is used for priming and spraying larger areas from further away and lower pressure for close in detail work. Lower pressure needs more thinned paint.
My old thumb-pallet and some blue-tac made for a MacGyver airbrush holder. Put in thinner first so the paint isn't so thick that it clogs the area around the needle. Mix it up with an old paint brush (watch out so you don't scratch the needle with the ferrule on the paint brush) and block the nozzle with your finger and let air through, to create a back flow, where air finds its way up into the paint cup and by doing so mixes it from the bottom.
Pre-mixed airbrush cleaner with water in a squeezy
bottle.
Empty out any paint not used up, never blow paint through the airbrush unnecessarily. I've got an old yoghurt bucket that works fine for this purpose. Squirt some cleaner in the cup and mix around with a paint brush and a bit of back flow. Again, empty out in the bucket not blowing through the nozzle. Squirt some more cleaner in and repeat. When you're happy with there is no longer any paint residue, you can blow some of the cleaner through the brush to clean the nozzle.
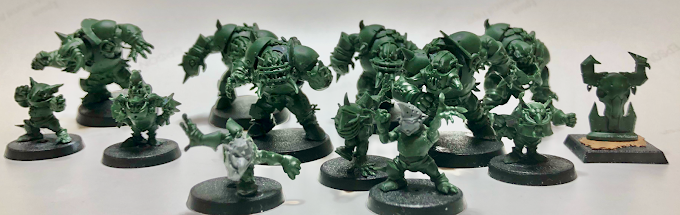
Zenithal highlight or Zenithal Priming. I primed my Black Orc Team brown with a hint of purple. Then I sprayed them with a bone colour making sure to not hit anything from below to leave the deepest shadows brown and then I hit them with an off-white just from above. It will be interesting to see how much impact this will have on the finished product.


Comments
Post a Comment